
Before getting into the technicalities of creating Instant-Clone Desktop Pool let us talk about what exactly are Instant Clones and its functionality.
Instant Clone Technology is all about delivering VDI desktops just in time.However VMware asks us to use Dynamic environment manager along with App Volumes to achieve the same.Instant Clone Technology allows administrators to rapidly clone and deploy a virtual machine in less time than it took for you to read these two sentences. Yes, that is one clone created per second on average.
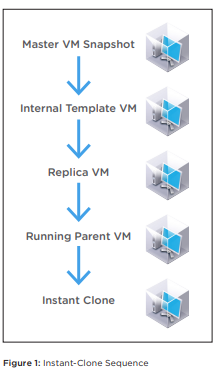
The process of creating Instant clones are very fast, the reason being it doesn't create a full VM with OS and other required disk they just shared OS,disk and memory of the parent VM on the go.The initial process of creating Instant clones might take a bit of time as there are multiple operations the master image with go through to make other operations like recompose go smoother.
Below folders are created as a part of Instant Clones whenever a pool is pushed.

Below is the difference between and Linked clone and an instant clone, the reason we arent discussing about instant clone as they are deprecated and no longer available in latest releases of Horizon

Instant Clone Technology (that is, vmFork) uses rapid in-memory cloning of a running parent virtual machine, and copy-on-write to rapidly deploy the virtual machines.
Before getting started with the Pool creation make sure to add domain under Setting and domains tab domains


- Make sure our domain name is visible as shown below

Lets gets started with creating instant clone desktop pool,To create a linked clone desktop pool login to the connection Server as below :

- Click on desktops on to the left under Inventory and click Add.

- Click on Instant clones and make sure your vCenter is showing here

- You can either select Floating assignment which means users get a new desktop every time he logs in , but i am going with dedicated as i want my user to get the same every time he logs in.

- Click next in the next screen , if you want to select different DS for OS disks and Replica disk you can choose here


- Enter the naming pattern, in the below entered pattern {n} indicates desktop number for each unique user.

- I have chosen to create 1 Desktop as there will be one more created as spare when another user tried to login.

- choose golden image we create in our earlier blog and choose snapshot that was taken after all the apps are installed

- Also choose VM folder location and Cluster, Data store where you want to save the VM


- Make sure to create a separate OU as we might have to make changes to group policy in earlier stage, in my case i create an OU called VDI

- Review the changes and click submit

- We can see that a desktop pool is created

- As discussed earlier we can see below folders being create under templates folder in vCenter

- While the pools and desktops are getting created, make sure to add users whom you want the desktops to be entitled.
- I created vdisuer1 and vdiuser2 and added them as entitlements to desktop pool we created


- Once submitted you can view the user entitlements

- We can see from the below screen shot that desktop is created and added to domain and a DHCP from the pool is also assigned.

- You can notice the same under machines

- Since we chose manual assignment, we need to assign the user as below, click on the desktop and go to more command and assign user.

- I am assigning the desktop to vdiuser1

Let us have a look at how we access the destops in our next blog


0 Comments